
In this part of the series I will cover how to create your first job in Jenkins which will make use of all of the tools installed in the previous two sections of this series.
If you haven’t seen the previous two sections, they can be reached via the links below.
Part 1: Installing the PHP Tools and Jenkins
Part 2: Installing the Plugins and Configuring Jenkins
To begin I will talk about the directories and files you will need to have in your repository for your build to be successful, followed by a discussion of each of those files list, and then then I will cover the creation of your first job. But, first, I will provide the links to the downloads in this post, up front for convenience.
Downloads
For convenience, here are all of the downloads covered in this post, so you don’t need to ferret out the links.
Directory Structure and Files
Below is the minimal directory structure and files that you will need for the build script to work in Jenkins. StructureExample is the root folder for the repository (just think of it as the trunk folder in a subversion repository)
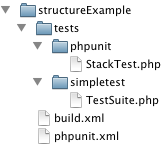
Directory structure and minimal files
From the above image you can see that there are two files “build.xml” and “phpunit.xml” in the root directory.
- build.xml is an XML file that tells Ant what to do when performing a build.
- phpunit.xml defines several parameters for PHPUnit to use during its portion of the build.
The location of these files are pretty standard; however, what is not so standard is that I have split the unit tests out into separate directories under the tests directory. This was done to keep all of the PHP Unit tests separate from the SimpleTest tests.
For convenience you download the above directory structure and files here. The download included several versions of build.xml (build.xml.both, build.xml.simpletest, build.xml.phpunit) so you can pick the appropriate version for your build by renaming the appropriate file to build.xml.
Build.xml
The build.xml file is the most important file in the directory; it tells ant what to do during execution. The file is a little long, roughly 178 lines and created the directory structure shown below. Since this file is so important I will cover the sections that will be used while performing a build on Jenkins.

The fist thing to do is to put the name of your project in the file, in the name attribute for this line:
<project name="your-project-name-here" default="build">
Note that the above line also sets the default target to perform “build”. This line;
<target name="build"
        depends="prepare,lint,phploc,pdepend,phpmd-ci,phpcs-ci,phpcpd,phpdoc,phpunit,simpletest,phpcb"/>
This target depends on several other targets to be successful (meaning each of the dependent targets need to complete successfully).
Dependent Targets:
- prepare –> Ensures that the workspace is setup correctly by wiping out old folders and remaking them.
- lint –> calls php -l, to perform a syntax check on all of the php files in the directory.
- phploc –> Uses PHP Loc to determine the number of lines of code in the project.
- pdepend –> Runs pDepend and creates the dependency reports.
- phpmd-ci –> Runs PHP Mess Detector to check for code smells and generates some reports of the results.
- phpcs-ci –> Runs PHP CodeSniffer on the code in the project to check for coding standard violations and generats a report of the results.
- phpcpd –> Runs PHP Copy Paste Detector which looks for duplicate lines of code.
- phpdoc –> Generates API documentation using PHP Documentor 2
- phpunit –> Performs the tests located in tests/phpunit, and uses phpunit.xml for its configuration. After which it creates a report of the results
- simpletest –> Performs the tests in the TestSuite defined in test/simpletest/TestSuite.php, and then creates a report of the results
- phpcb –> Creates a browsable report of your code
Target Definitions
Prepare
The prepare target depends on the clean target, which removes all the directories under the build directory in the workspace. After which, the prepare target re-creates them. ${basedir} contains the path to the current projects (jobs) workspace. For example, if your job was called “example-job” is would contain the path /var/lib/jenkins/jobs/example-job/workspace.
<target name="clean" description="Cleanup build artifacts">
   <delete dir="${basedir}/build/api"/>
   <delete dir="${basedir}/build/code-browser"/>
   <delete dir="${basedir}/build/coverage"/>
   <delete dir="${basedir}/build/logs"/>
   <delete dir="${basedir}/build/pdepend"/>
</target>

<target name="prepare" depends="clean" description="Prepare for build">
    <mkdir dir="${basedir}/build/api"/>
    <mkdir dir="${basedir}/build/code-browser"/>
    <mkdir dir="${basedir}/build/coverage"/>
    <mkdir dir="${basedir}/build/logs"/>
    <mkdir dir="${basedir}/build/pdepend"/>
</target>
Lint
This target uses the php command with the -l parameter to perform a syntax check on the php files in the project. While excluding the tests directory from its check.
<target name="lint" description="Perform syntax check of sourcecode files">
    <apply executable="php" failonerror="true">
        <arg value="-l" />

        <fileset dir="${basedir}">
            <include name="**/*.php" />
            <!-- exclude the tests directory, repeat line below to exclude more -->
            <exclude name="tests/**" />
            <modified />
        </fileset>

        <fileset dir="${basedir}/tests">
            <include name="**/*.php" />
            <modified />
        </fileset>
    </apply>
</target>
Phploc
This uses PHP Loc to determine the size of the project. The constructed command looks like phploc –exclude ${basedir}/tests –log-csv ${basedir}/build/logs/phploc.csv ${basedir}.
This command tells phploc to look at the code in ${basedir} but exclude the tests directory and to publish the report to build/logs/phploc.csv
<target name="phploc" description="Measure project size using PHPLOC">
    <exec executable="phploc">
        <!-- exclude tests directory -->
        <arg value="--exclude" />
        <arg path="${basedir}/tests" />
        <arg value="--log-csv" />
        <arg value="${basedir}/build/logs/phploc.csv" />
        <arg path="${basedir}" />
    </exec>
</target>
Pdepend
This target uses PHP Depend to create several metric reports about your code.
- An Overview pyramid covering inheritance, size and complexity, and coupling. You can find information about the pyramid here
- An Abstract Instability Chart, which you can find information on here
The target, again ignores the tests directory, as most of the targets do.
<target name="pdepend" description="Calculate software metrics using PHP_Depend">
    <exec executable="pdepend">
        <arg value="--ignore=${basedir}/tests,${basedir}/docs" />
        <arg value="--jdepend-xml=${basedir}/build/logs/jdepend.xml" />
        <arg value="--jdepend-chart=${basedir}/build/pdepend/dependencies.svg" />
        <arg value="--overview-pyramid=${basedir}/build/pdepend/overview-pyramid.svg" />
        <arg path="${basedir}" />
    </exec>
</target>
Phpmd-ci
This target uses PHP Mess Detector to check your code for common smells (indicators of possible bad coding or design). There are several rulesets you can use when checking your code: codesize, controversial, design, naming, and unusedcode. You can read about the rulesets here to figure out what each one covers.
You can also define your own rulesets of modify existing rulesets using an xml file. To learn more about there go here and checkout the menu on the right.
The current target configuration tells phpmd to create an xml report, using the codesize ruleset, and place the report in build/logs/pmd.xml. It should examine the current workspace and exclude the test directory.
<target name="phpmd-ci" description="Perform project mess detection using PHPMD creating a log file for the continuous integration server">
    <exec executable="phpmd">
        <arg path="${basedir}" />
        <arg value="xml" />
        <arg value="codesize" />
        <arg value="--reportfile" />
        <arg value="${basedir}/build/logs/pmd.xml" />
        <arg value="--exclude" />
        <arg value="${basedir}/tests" />
    </exec>
</target>
Phpcs-ci
This target uses PHP CodeSniffer to check the code in the project, excluding the tests directory, for Zend coding standard violations. The results of the analysis are then put into a checkstyle report in build/logs/checkstyle.xml.
To learn about the available standards and functionality of PHP CodeSniffer, visit here
<target name="phpcs-ci"
        description="Find coding standard violations using PHP_CodeSniffer creating a log file for the continuous integration server">
    <exec executable="phpcs" output="/dev/null">
        <arg value="--report=checkstyle" />
        <arg value="--report-file=${basedir}/build/logs/checkstyle.xml" />
        <arg value="--standard=Zend" />
        <arg value="--ignore=${basedir}/tests" />
        <arg value="--extensions=php" />
        <arg path="${basedir}" />
    </exec>
</target>
Phpcpd
This target uses PHP Copy Paste Detecter to check for duplicate lines of code in your project, excluding the tests directory, and outputting the results in build/logs/pmd-cpd.xml
<target name="phpcpd" description="Find duplicate code using PHPCPD">
    <exec executable="phpcpd">
        <arg value="--log-pmd" />
        <arg value="${basedir}/build/logs/pmd-cpd.xml" />
        <arg value="--exclude" />
        <arg path="${basedir}/tests" />
        <arg path="${basedir}" />
    </exec>
</target>
Phpdoc
This target uses PHP Documentor 2 to create API documentation of your code. You can find documentation about using phpdoc here.
<target name="phpdoc" description="Generate API documentation using phpDocumentor 2">
    <exec dir="${basedir}" executable="phpdoc" failonerror="true">
        <!-- excluded directories need the / at the end, else phpdoc ignores it -->
        <arg line="--title='test title' -d . -t build/api -i tests/ " />
    </exec>
</target>
Phpunit
This target runs your unit tests using PHP Unit. By default, PHP Unit checks the current directory for a configuration xml file, which is our phpunit.xml file. Because we took this approach, there is not much in the definition of this target.
However, you can find plenty about what you can put in the configuration file here
<target name="phpunit" description="Run unit tests with PHPUnit">
    <exec executable="phpunit" failonerror="true"/>
</target>
Simpletest
This target defines how to perform our unit/functionality tests using SimpleTest. You’ll notice that this target definition is a little different than the others. The reason is, is that SimpleTest does not have a nice command line tool that takes parameters like the other tools we are using. To make SimpleTest work, we need to create a little inline bash script.
The one-liner bash script that we will use tells the shell to use php to run TestSuite.php file and then send its output to XML Lint for formatting and output into build/logs/simpletest-results.xml
<!-- Inline bash script to run TestSuite.php and pipe its results to xmllint -->
<!-- XML Lint then outputs the results to simpletest-results.xml -->
<target name="simpletest" description="Run SimpleTest unit tests">
    <exec dir="${basedir}" executable="bash" failonerror="true">
        <arg value="-c"/>
        <arg line='"php tests/simpletest/TestSuite.php | xmllint --format -o build/logs/simpletest-results.xml -"' />
    </exec>
</target>
Phpcb
This target uses PHP CodeBrowser to create a browsable interface of your code in your project.
<target name="phpcb" description="Aggregate tool output with PHP_CodeBrowser">
    <exec executable="phpcb">
       <arg value="--log" />
       <arg path="${basedir}/build/logs" />
       <arg value="--ignore" />
       <arg path="${basedir}/tests" />
       <arg value="--source" />
       <arg path="${basedir}" />
       <arg value="--output" />
       <arg path="${basedir}/build/code-browser" />
    </exec>
</target>
phpunit.xml
This file is used to store our configuration for running PHP Unit.
For the over definition, we tell php unit to not backup and restore $GLOBALS or static attributes of user defined classes, to run in strict mode and have verbose output.
For our test suite settings, we set the name (which you should change) and tell php unit to run all of the tests in the php files in tests/phpunit.
Next for our logging settings, we tell PHP Unit to create a coverage report in build/coverage, with the title of your project (don’t forget to set this attribute value) and several other attributes. We also want a coverage-clover report in build/logs/clover.xml and a junit report in build/logs/junit.xml
To learn creating your own PHP Unit configuration file visit here
<?xml version="1.0" encoding="UTF-8"?>

<phpunit backupGlobals="false"
         backupStaticAttributes="false"
         strict="true"
         verbose="true">

  <testsuites>
    <testsuite name="Your Test Suit Name Here">
      <directory suffix='.php'>./tests/phpunit</directory>
    </testsuite>
  </testsuites>

  <logging>
    <log type="coverage-html" target="build/coverage" title="Your Project Name Here"
         charset="UTF-8" yui="true" highlight="true"
         lowUpperBound="35" highLowerBound="70"/>
    <log type="coverage-clover" target="build/logs/clover.xml"/>
    <log type="junit" target="build/logs/junit.xml" logIncompleteSkipped="false"/>
  </logging>

</phpunit>
TestSuite.php
This file defines out Test Suite for SimpleTest. For our test suite, we define the class MyTests and add the Test Files we want to run using the addFile method. Take note of the use of the magic word __DIR__. This is used so no matter where this file is being invoked from, we won’t have to worry about how the test files are included.
To run the tests in the test suite, a new instance of the class is made and then ran using the JUnitXMLReporter class, so we can jUnit and xUnit compatible output. I had noticed in some other blogs that there was a problem with the header and footer printing in non xml; however, this approach does not have that problem.
/**
 * Include the simpletest file so we can extend TestSuite
 */
require_once 'simpletest/simpletest.php';
/**
 * Include the JUnitXMLReporter class so the output is jUnit and xUnit compatible
 */
require_once 'simpletest/extensions/junit_xml_reporter.php';

class MyTests extends TestSuite
{
    function __construct()
    {
        parent::__construct();

        //add the files containing the tests we want to perform
        //note the use of __DIR__ so we don't have to worry about file location
        //when running the tests in Jenkins
        $this->addFile(__DIR__.'/TemplateTest.php');
    }

}

$test = new MyTests();
$test->run(new JUnitXMLReporter());
Example Test File – TemplateTest.php
I thought it might be pertinent to show an example test file for use with the Test Suite defined above. In the code below, you will notice that I never include simpletest/autorun.php, I only include simpletest/web_tester.php. This is because I want complete control over the running of the tests and their output.
<?php
require_once 'simpletest/web_tester.php';

class TemplateTest extends WebTestCase {
    function testLoginPageShowForm() {
        $this->get('https://example.domain.com/site/login/form.php');
	$this->assertFieldById('_userName');
    }
}
StackTest.php
This is a simple PHP Unit test file that just does some pushing and popping of an array. In fact, it is the example from chapter 4 “Writing Tests for PHPUnit” from PHP Units web site here
<?php
/**
 * Include the PHPUnit Framwork so we can extend the TestCase class
 */
require_once 'PHPUnit/Autoload.php';

class StackTest extends PHPUnit_Framework_TestCase
{
    /**
     * Tests pushing and popping of elements on and off of an array
     *
     * @return Void
     */
    public function testPushAndPop()
    {
        $stack = array();
        $this->assertEquals(0, count($stack));

        array_push($stack, 'foo');
        $this->assertEquals('foo', $stack[count($stack)-1]);
        $this->assertEquals(1, count($stack));

        $this->assertEquals('foo', array_pop($stack));
        $this->assertEquals(0, count($stack));
    }
}
Setting Up Your First Jenkins Job
This section will cover setting up your first job in jenkins using an existing template. The first thing you will need to do is add the job template to Jenkins.
Adding the job-template To Jenkins
There is a lot of configuration that needs to be done to use all the tools that we’ve installed and referenced in our build.xml file. So, let’s cut out a lot of the work and use an existing job template that has the majority of work done for us already.
- Go to the Jenkins job directory
$cd /var/lib/jenkins/job
- Download the job template
$wget https://googledrive.com/host/0B8dI-j7Xg0phVDRjMnN6QUhfcXc -O job-template.tar.gz
- Extract the job template
$tar xvf job-template.tar.gz
- Set the permissions on the directory
$chown -R jenkins:nogroup job-template/
Setting up the Jenkins Job
- Login to Jenkins and click “New Job”
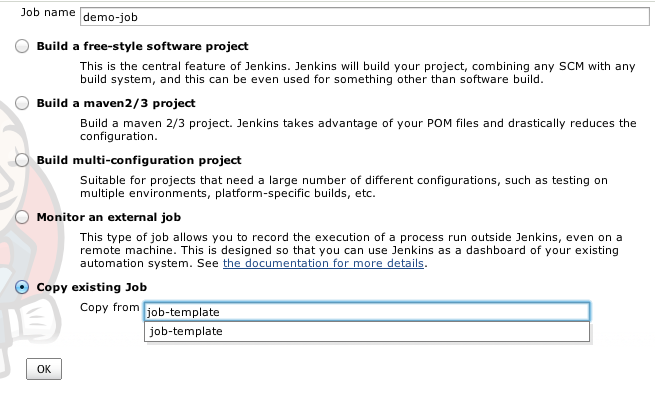
- Enter the name of your job
NOTE: It is a good idea to not have spaces in your job name as it can cause problems
- Select “Copy Existing Job”
- In the “Copy From” field, type “job-template” (without the quotes)Your screen should look like this

- Click “OK”
- Uncheck “Disable Build”
- If you want to use project based security.
Check “Enable project-based security”You’ll see a permission matrix appear and a field to add a user or group to the matrix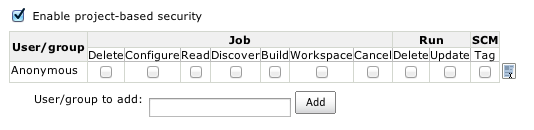
Enter the user or group you want to set the rights for into the “User/group to add” field and click add
Then set their permissionsNOTE: Make sure to add yourself or you’ll encounter an issue where your build history disappears until you restart Jenkins
- Under the “Source Code Management” section, select “Subversion
- Enter the URL to your subversion repository in the “Repository URL” field

If Jenkins cannot talk to your repository, you may need to enter your credentials.- Click the “enter credentials” link in the error message
- Select Username/password authentication
- Enter your credentials
- Click OK

- Under the “Build Triggers” sectionSelect Poll SCM and use the document linked in the button to determine what you need to enter for your schedule
- If you do not want to use PHP Unit or SimpleTest
Way down under the “Publish xUnit test result report” section, click the delete button for for the unit test suite you don’t want to use.
PHP Unit
SimpleTest

- Click Save
Note: If you click Apply and then Save, Jenkins throws a parse error - With your job created, you can now perform a build by clicking “Build” on the left side of the screen


As a final note, you will not see many graphs on the main page of a job until you have performed at least two builds.
