Category: CAS


SiteImprove SSO with CAS 5.2.x

SiteImprove offers a service that will have a spider check your links on your sites for validity and report if they are down.  By default users are manually created and local to SiteImprove.  If you want to use a different account to login, you need to setup Single Sign On (SSO), which Site Improve supports via SAML2.  Thankfully, setting this up isn’t too difficult, though the available instructions on their site, currently, are for Okta, but we are going to be using CAS.


To do this you will need to do the following:

  1. Enable SAML Support in CAS
  2. Configure Your cas.properties File
  3. Generate and Configure Your IDP-Metadata
  4. Create Your Service
  5. Configure SiteImprove and Test
  6. Restrict Access


Enable SAML Support in CAS

If you have not already enabled support for SAML and for CAS to act as an IDP, add the following to your pom.xml file

<dependency>
    <groupId>org.apereo.cas</groupId>
    <artifactId>cas-server-support-saml-idp</artifactId>
    <version>${cas.version}</version>
</dependency>


You may also need to add the following under the repository section of your pom.xml file

<repositories>
 ...
     <repository>
         <id>shibboleth-releases</id>
         <url>https://build.shibboleth.net/nexus/content/repositories/releases</url>
     </repository>
 ...
</repositories>


Once you’ve done that, move on to configuring your cas.properties file before you rebuild your war overlay package and restart tomcat.


Configure Your cas.properties File

With SAML Support turned on, we can now set the settings needed to generate our idp-metadata.xml file.  Open your cas.properties file and set the following;

#==========================
# SAML Authentication
#==========================
cas.authn.samlIdp.entityId=${cas.server.prefix}/idp
cas.authn.samlIdp.scope=example.com #replace this with yours
cas.authn.samlIdp.metadata.privateKeyAlgName=RSA
cas.authn.samlIdp.metadata.location=file:/etc/cas/saml
cas.authn.samlIdp.attributeQueryProfileEnabled=true


Save the file and now rebuild your mav overlay using the command “mvn clean package”.  After which you should restart Tomcat.


Generate and Configure Your IDP-Metadata

If you restarted Tomcat in the previous step and didn’t already have IDP metadata generated, CAS will generate that and its accompanying signing and encryption keys now.  The generated file will be fairly complete and only needing some minor modification.  The only thing you should need to do is uncomment the <AttributeAuthorityDescriptor> section in your idp-metadata.xml file.  Other than that, it wouldn’t hurt to flesh out your <ContactPersons> in the file, but that isn’t required.


The <AttributeAuthorityDescriptor> section should look like this

<AttributeAuthorityDescriptor protocolSupportEnumeration="urn:oasis:names:tc:SAML:1.1:protocol urn:oasis:names:tc:SAML:2.0:protocol">
    <Extensions>
        <shibmd:Scope regexp="false">your_scope.com</shibmd:Scope>
    </Extensions>
    <KeyDescriptor use="signing">
       <ds:KeyInfo>
           <ds:X509Data>
               <ds:X509Certificate>
                   <!-- Your generated signing cert info here -->
               </ds:X509Certificate>
           </ds:X509Data>
       </ds:KeyInfo>
    </KeyDescriptor>
    <AttributeService Binding="urn:oasis:names:tc:SAML:1.0:bindings:SOAP-binding" Location="https://your_cas_server.com/cas/idp/profile/SAML1/SOAP/AttributeQuery"/>
    <AttributeService Binding="urn:oasis:names:tc:SAML:2.0:bindings:SOAP" Location="https://your_cas_server.com/cas/idp/profile/SAML2/SOAP/AttributeQuery"/>
 </AttributeAuthorityDescriptor>


Create Your Service

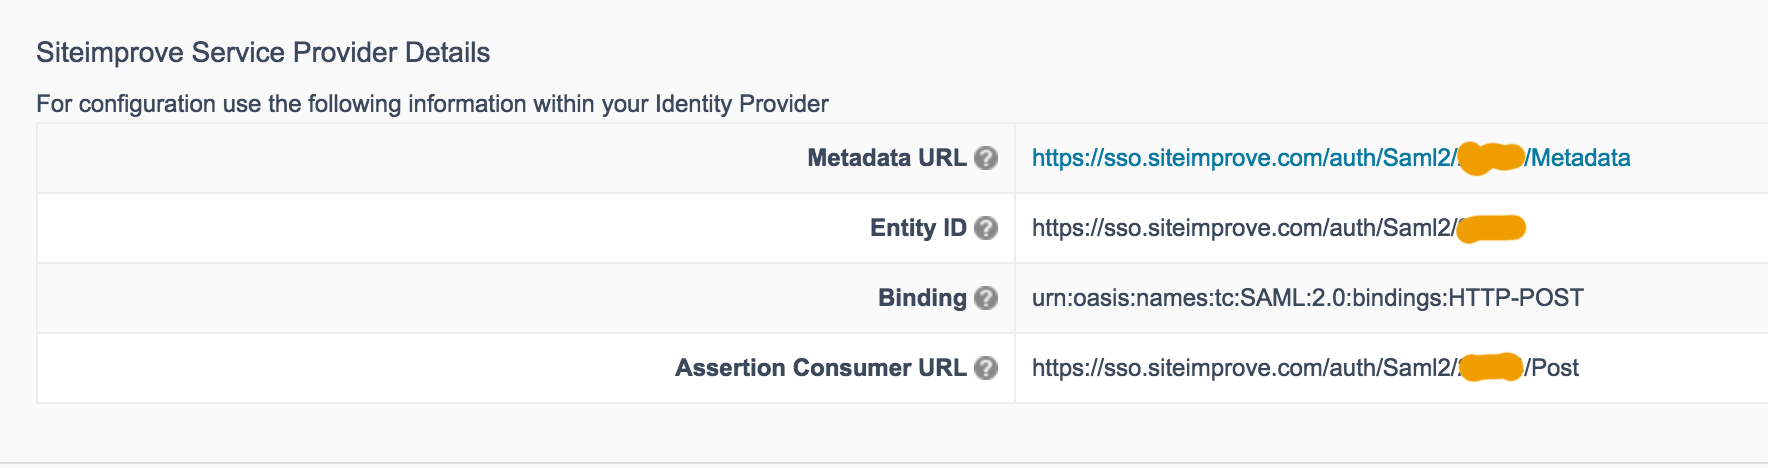
Next we need to make a service in CAS for SiteImprove.  At this point you’re going to need grab a few details from SiteImprove which can be found under Settings -> Single Sign On -> SAML Authentication -> Configure.  Under the SiteImprove Service Provider Details section, make not of the Metadata URL and Entity ID properties as we will need them in our service definition.  These are important because they are specific to your account.


If you are using something other than the JSON Service Registry for CAS, you’ll need to adapt the below configuration to your own.

File Name: SiteImprove-10000010.json

{
    "@class" : "org.apereo.cas.support.saml.services.SamlRegisteredService",
    "serviceId" : "^https://sso.siteimprove.com/auth/Saml2/<your siteimprove account id>",
    "name" : "SiteImprove SAML",
    "id" : 10000010,
    "evaluationOrder" : 1,
    "usernameAttributeProvider" : {
        "@class" : "org.apereo.cas.services.PrincipalAttributeRegisteredServiceUsernameProvider",
        "usernameAttribute" : "sAMAccountName"
    },
    "attributeReleasePolicy" : {
        "@class" : "org.apereo.cas.services.ReturnMappedAttributeReleasePolicy" ,
        "allowedAttributes" : {
            "@class" : "java.util.TreeMap",
            "sAMAccountName" : "Username",
            "mail" : "Email",
            "givenName" : "FirstName",
            "sn" : "LastName"
        }
    },
    "requiredNameIdFormat" : "urn:oasis:names:tc:SAML:2.0:nameid-format:persistent",
    "metadataLocation" : "https://sso.siteimprove.com/auth/Saml2/<your account number here>/Metadata",
    "signAssertions": true,
    "signResponses": false
}


A quick break down of the file above:

  • serviceId is your SiteImprove Metadata URL
  • usernameAttributeProvider is set to use the sAMAccountName as the username
  • attributeReleasePolicy is being configure to map sAMAccountName to Username, mail to Email, givenName to FirstName, and sn to LastName as these attributes are expected by SiteImprove
  • requireNameIdFormat is overriding the format of the username and setting it to persistent
  • signAssertions is set to turn because SiteImprove requires that assertions from our IDP be signed
  • signResponses is set to false, because if both signAssertions and signResponses are true, then assertions must be encrypted and to my knowledge, SiteImprove doesn’t support that.

Once you are done editing the service file, save and give Tomcat one more reboot.


Configure SiteImprove and Test

Now that we have our IDP setup and our service configured, we can now tell SiteImprove what it needs to know. For this part you only need to configure two parameters.

Under the section “Your Identity Provider Details” set the Login URL to your HTTP-Redirect SSO endpoint.

https://your_cas_server.com/cas/idp/profile/SAML2/Redirect/SSO


Next, enter the contents of the file etc/cas/saml/idp-signing.crt into the Certificate input.

Once you have done the above steps, click the “Save and Test” button at the bottom of the page.  Note that you may need to do this twice before SiteImprove will pull up your login site as the configuration page has a somewhat short timeout and will throw a page not found error on the first attempt after timeout.  All you need to do is click the button again and it should work.  If every thing is good, you should be greeted by a screen saying the login was successful and the attributes it pulled back.


Restrict Access

With your SSO now working for SiteImprove, you’ll want to secure your CAS service because SiteImprove does not restrict access for sign-ins.  The reason for this is that when you use SSO for SiteImprove, users are created by signing in via SSO.  So, if you want to restrict who can authenticate, you need to setup your CAS service to handle authorization.  Thankfully, this is pretty easy.

All you need to do is open your service definition and add the following section to your service definition:


"accessStrategy" : {
    "@class" : "org.apereo.cas.services.DefaultRegisteredServiceAccessStrategy",
    "enabled" : true,
    "ssoEnabled" : true,
    "requiredAttributes" : {
        "@class" : "java.util.HashMap",
        "memberOf" : [ "java.util.HashSet", [ "<group DN here>" ] ]
    }
 }


The above snippet tells CAS that for someone to sign in to the service, they must have the specified group DN present in their memberOf attribute (make sure you are pulling memberOf as part of your principle attributes or it is being released for this service).

If you hate the idea of have that huge group DN in your service definition and instead want something smaller and easier to use, you can setup a groovy script for attribute release that processes the memberOf attribute and only keeps the names of the groups and puts them in a new variable called, groups.

Say by adding something like this:

"attributeReleasePolicy" : {
     "@class" : "org.apereo.cas.services.GroovyScriptAttributeReleasePolicy",
     "groovyScript" : "classpath:your_groove_script.groovy"
 }

note: classpath points to src/main/resources in your maven overlay directory


Example snippet of looping over the attributes by key in groovy

def formattedAttribues = [:]

//loop through the principles attributes
args[0].each { key, value ->
    switch(key) {
        case 'memberOf':
            def roles = []
            
             //iterate over groups and pullout only the content of CN
             for (group in value) {
                 def m = group =~ /CN=(.*?)(?:,[A-Z]+=|$)/
                 
                 //add the matched CN
                 if ((m)) {
                     roles.add(m.group(1))
                 }
             }

             //add parsed groups to groups in formattedAttributes map
             formattedAttribues['groups'] = roles

             break

             default:
                 formattedAttribues[key] = value
                 break
    }
};

return formattedAttributes;


And that’s it, now you can use the line below in your service definiton, instead of checking for the whole group DN

"groups" : [ "java.util.HashSet", [ "<group name here>" ] ]

Prior to version 5.x of CAS, JSTL was used via JSP pages and it was easy to extend the CAS 2.0 protocol to release attributes as a snippet for release was provided in the documentation.

If you have recently upgraded to the 5.x version, you might have noticed that the templating engine has changed to Thymeleaf 2.1 which uses html pages instead of jsp, and there is no longer a helpful snippet of code to extend the CAS 2.0 Protocol in the documentation to release attributes.   Granted, the 3.0 protocol releases attributes by default, but you might need to provide auth services to a few end points that don’t use the 3.0 protocol.

After a short while of groking Thymeleaf, I came up with the following code to release whatever attributes you give it, under the CAS 2.0 Protocol.  Any attributes that are lists, will be split on “, ” and release as an array of elements.

The older attribute processor could actually notice that an attribute was a list and split it easily; however, in 5.x all the attributes under the 2.0 protocol are provided as a string of “attribute name=value”, which requires a bit more processing.

Also, the split function is by a single character only, so, that being the case I did a cheap move of replacing “, ” with “|” and splitting on “|”.  This should work for most group lists and standard lists, not splitting the space in a display name or between DN elements.  Though it is possible that “|” might be in the list already as it is a valid character for Group names in AD, my company just happens to not have groups with this character in the name or their DN.  Yours might and you might need to pick a different character.

File: casServiceValidationSuccess.html


Screen Shot 2017-08-29 at 9.00.17 PM

Image of the code because it refused to paste in right

You can download the html here

It’s not the best code in the world, but hopefully, it will save some of you a few hours of your life so you can get on to the next problem/project sooner.

Introduction

This post will cover the installation of Tomcat 7 and Central Authentication Service (CAS) 3.52.  Although the process is pretty straight forward, there are a lot of bits of information scattered all around for setting these two things up and I figured bringing those to a single place would be useful for others.

Beyond installing CAS and Tomcat 7, this post will cover:

  • Configuring and Hardening (SSL wise) Tomcat 7


The next part will cover:

  • Authenticating against LDAP
  • Using the JPA Ticket Registry with Postgresql

Installing Tomcat 7 and Needed Libraries

To setup Tomcat 7, its needed libraries, and the libraries you will need for CAS, run the following commands:

sudo apt-get update
sudo apt-get install tomcat7 maven2 default-jdk libctnative-1 libssl-dev

The above commands will install

  • maven2  → This will be used for CAS.  We will be using the WAR overlay method.
  • Tomcat 7
  • default-jdk (openjdk-6) → This is needed by CAS
  • libctnative-1 → Installs libraries that will be needed by Apache Portable Runtime
  • libssl-dev  → Installs libraries for SSL

After the installation there will be several new environment variables that you may want to set (though Tomcat figures them out automatically).

  • CATALINA_HOME = /usr/share/tomcat7
  • CATALINA_BASE = /var/lib/tomcat7     (we’ll be doing most of our configuring here)
  • JAVA_HOME = /usr/lib/jvm/java-6-openjdk-amd64

Note: For the rest of this post and in the other parts of this series, I will use the above variable names.

My JAVA_HOME Path is Different! What Do I Do?

It is possible that your JAVA_HOME path may be different.  If you are not running a 64-bit system, the path will probably be /usr/lib/jvm/java-6-openjdk.

If this is not your path you can use the find command to find the cacerts file, which should help you get the path (minus the /jre/lib/security/ part) like so:

find / -name "cacerts"

Or you can check your java alternatives using the update-java-alternatives command, like so:

update-java-alternatives -l

Note: If your java path does not fit /usr/lib/jvm/java-6-openjdk-*  or /usr/lib/jvm/java-7-openjdk-*, you will need to set the environment variable JAVA_HOME because Tomcat will not find it.

Configuring Tomcat 7 for SSL

To setup Tomcat to use SSL you will need to either have a self signed certificate or a signed certificate from a Certificate Authority like DigiCert or Verisign.  If you want to create a self signed cert, check out this tutorial Creating a Self Signed Cert.  If you already have a signed certificate then you can move on to the next part.

When configuring Tomcat to use SSL, you have two options for how you want to do it.  The first way is to import the certificate into the cacerts file and use the keystoreFile and keystorePass attributes in the Connector declaration in the server.xml file for Tomcat.  If you want to use this approach MuleSoft has a good tutorial on how to do it here (This tutorial also includes the second method close to the bottom).

The other way (the one I’m doing) is to use the attributes SSLCertificateFile and SSLCertificateKeyFile to reference the files directly.  Whichever way you choose to go, be sure to define the ciphers attribute like I have done in the code snippet below.  This is needed because by default Tomcat will use whatever ciphers the Java library has to offer and some of these are very weak.

Once you have your SSL certificate and key file ready and stored in some place like /etc/ssl/certs you can move on to configuring Tomcat.  For this part

  1. Edit $CATALINA_BASE/conf/server.xmlUn-comment the following section:
    <Connector port="8443" protocol="HTTP/1.1" SSLEnabled="true"
        maxThreads="150" scheme="https" secure="true"
        clientAuth="false" sslProtocol="TLS" />
    

    And make it look like

    <Connector port="8443" protocol="HTTP/1.1" SSLEnabled="true"
                   maxThreads="150" scheme="https" secure="true"
                   clientAuth="false" sslProtocol="TLS"
                   SSLCertificateFile="/some/path/cert.crt"
                   SSLCertificateKeyFile="/some/path/cert.key"
                   ciphers="TLS_RSA_WITH_AES_128_CBC_SHA, TLS_RSA_WITH_AES_128_CBC_SHA256,
                            TLS_DHE_RSA_WITH_AES_128_CBC_SHA, TLS_DHE_RSA_WITH_AES_128_CBC_SHA256,
                            TLS_DHE_DSS_WITH_AES_128_CBC_SHA, TLS_DHE_DSS_WITH_AES_128_CBC_SHA256,
                            SSL_RSA_WITH_3DES_EDE_CBC_SHA, SSL_DHE_RSA_WITH_3DES_EDE_CBC_SHA,
                            SSL_DHE_DSS_WITH_3DES_EDE_CBC_SHA" />
    

    Note: If you are sure that you will not have any Windows XP clients, you can remove the 3DES ciphers.

  2. Save the file
  3. Edit /etc/default/tomcat7 and add “-Dhttps.protocols=TLSv1” to the JAVA_OPTS line. Mine looks like this:
    JAVA_OPTS="-Djava.awt.headless=true -Xms512M -Xmx1024M -XX:+UseConcMarkSweepGC -XX:+CMSClassUnloadingEnabled -XX:MaxPermSize=512m -XX:+CMSIncrementalMode -Dhttps.protocols=TLSv1"
    

    Note: You need to make this change because java will allow different ciphers than your restricted CAS instance, which will cause SSL issues.
    Note 2: The other parameters in the above line let the JVM allocate more memory for your CAS instance and have it clean said memory more often to make more efficient use of it.  It would probably be a good idea to use these flags as well, just adjusted to your servers capability.

  4. Save the file
  5. Restart tomcat
    /etc/init.d/tomcat7 restart

    Note: you may also want to watch the catalina log file in another console using

    tail -f $CATALINA_BASE/catalina.out
  6. Open a browser and navigate to https://your_server:8443.  If everything worked, you should see the “It Works” screen

Wait!  I Want to Use Port 80 and 443, not 8080 and 8443

If you want to use the standard HTTP and SSL ports of 80 and 443, make sure of the following first

  • No other application is binding to port 80 or 443
  • You are not using IP v6 (this is a restriction of AuthBind)


  1. Edit $CATALINA_BASE/conf/server.xml and change the following section:
    <Connector port="8080" protocol="HTTP/1.1"
                   connectionTimeout="20000"
                   URIEncoding="UTF-8"
                   server="Apache"
                   redirectPort="8443" />
    

    And make it look like

    <Connector port="80" protocol="HTTP/1.1"
                   connectionTimeout="20000"
                   URIEncoding="UTF-8"
                   server="Apache"
                   redirectPort="443" />
    
  2. Edit /etc/default/tomcat7  and make the AUTHBIND line look like:
    AUTHBIND=yes
    
  3. Restart tomcat


HTTPS Everywhere

Once you have HTTPS/SSL working from the previous part, let’s configure Tomcat so every site goes through HTTPS.

  1. Edit $CATALINA_BASE/conf/web.xml
  2. Add the following code snippet to the end of the file, just above the </web-app> line at the end of the file
        <security-constraint>
            <web-resource-collection>
                <web-resource-name>Protected Context</web-resource-name>
                    <url-pattern>/*</url-pattern>
            </web-resource-collection>
            <!-- auth-constraint goes here if you require authentication -->
            <user-data-constraint>
                 <transport-guarantee>CONFIDENTIAL</transport-guarantee>
            </user-data-constraint>
        </security-constraint>
    
  3. Save the file and restart Tomcat7
  4. Open a web browser and navigate to http://your_server:8080.  You should be redirected to https://your_server:8443.


Setting Up The CAS WAR Overlay

One of the easiest and recommend ways to setup CAS is to use the Maven WAR Overlay method. To do this, do the following: (or you can follow the guide from Jasig)

  1.   Create the workspace directory, in the future referred to as $project_home
    mkdir /opt/work/cas-local
    
  2. Create a file called pom.xml in the created folder, add add the following to it:
    <?xml version="1.0" encoding="UTF-8"?>
    <project xmlns="http://maven.apache.org/POM/4.0.0"
             xmlns:xsi="http://www.w3.org/2001/XMLSchema-instance"
             xsi:schemaLocation="http://maven.apache.org/POM/4.0.0 http://maven.apache.org/xsd/maven-4.0.0.xsd ">
        <modelVersion>4.0.0</modelVersion>
        <groupId>edu.university.cas</groupId>
        <artifactId>local-cas</artifactId>
        <packaging>war</packaging>
        <version>1.0-SNAPSHOT</version>
    
        <build>
            <plugins>
                <plugin>
                     <artifactId>maven-war-plugin</artifactId>
                                 <configuration>
                                     <warName>cas</warName>
                                 </configuration>
                            </plugin>
            </plugins>
        </build>
    
        <dependencies>
            <dependency>
                <groupId>org.jasig.cas</groupId>
                <artifactId>cas-server-webapp</artifactId>
                <version>${cas.version}</version>
                <type>war</type>
                <scope>runtime</scope>
            </dependency>
        </dependencies>
    
        <properties>
            <cas.version>3.5.2</cas.version>
        </properties>
    
            <repositories>
                 <repository>
                      <id>ja-sig</id>
                      <url>http://oss.sonatype.org/content/repositories/releases/ </url>
                 </repository>
            </repositories>
    </project>
    
  3. Change the groupId tag to have the url for your place of business.
  4. Next we will add the parts that actually make our CAS package building useful.  Our customizations.Create the directory $project_home/src/main/webapp/WEB-INF
  5. Create a file called deployerConfigContext.xml in the new folder, and populate it with this contents.
  6. (Optional) The default service context for CAS will work just fine out of the box, but only restrict traffic to IMAP(S) or HTTP(S)If you would like to be a little more restrictive to say, just your domain, you will want to change the following line in deployerConfigContext.xml
    <property name="serviceId" value="^(https?|imap?)://.*" />

    To something more restrictive, like:

    <property name="serviceId" value="^(https?|imaps?)://([A-za-z0-9_-]+\.)*(your_domain\.com)(:\d{1,5})?/.*" />

    This will restrict service to HTTP(S) or IMAP(S) from your domain only, with a possible port number in the url.
    Note: the “(:\d{1,5})?” part is not needed if you use port 80 and 443 for CAS.

  7. Create a file called cas.properties in the same folder, and populate it with this contents.
  8. Alter the following line:
    server.name=https://localhost:8080

    and change it to

    server.name=https://<your domain>:<port_number>

    e.x. server.name=http://cas.example.com:8443

  9. Alter this line
    host.name=cas01.example.org

    and change it to

    host.name=<your cas servers FQDN>

    e.x. host.name=cas.example.com

  10. Save the cas.properties file.
  11. (Optional) If you want to setup throttling of repeat authentication attemps
    1. Create the file $project_home/src/main/webapp/WEB-INF/cas-servlet.xml and populate it with this contents.
    2. Change the following bean:
        <bean class="org.springframework.webflow.mvc.servlet.FlowHandlerMapping" p:flowRegistry-ref="flowRegistry"
              p:order="2">
          <property name="interceptors">
            <ref local="localeChangeInterceptor"/>
          </property>
        </bean>
      

      to

        <bean class="org.springframework.webflow.mvc.servlet.FlowHandlerMapping" p:flowRegistry-ref="flowRegistry"
              p:order="2">
          <property name="interceptors">
                <list>
                      <ref local="localeChangeInterceptor"/>
                      <ref bean="throttleInterceptor"/>
                </list>
          </property>
        </bean>
      
    3. Create the file $project_home/src/main/webapp/WEB-INF/spring-configuration/throttleInterceptorTrigger.xml and put the following in it:
      <?xml version="1.0" encoding="UTF-8"?>
      <beans xmlns="http://www.springframework.org/schema/beans"
             xmlns:xsi="http://www.w3.org/2001/XMLSchema-instance"
             xmlns:p="http://www.springframework.org/schema/p"
             xsi:schemaLocation="http://www.springframework.org/schema/beans http://www.springframework.org/schema/beans/spring-beans-2.0.xsd">
      
      <bean id="throttleInterceptor" class="org.jasig.cas.web.support.InMemoryThrottledSubmissionByIpAddressAndUsernameHandlerInterceptorAdapter"
         p:failureRangeInSeconds="120"
         p:failureThreshold="100"/>
      
      <bean id="throttleInterceptorJobDetail" class="org.springframework.scheduling.quartz.MethodInvokingJobDetailFactoryBean"
         p:targetObject-ref="throttleInterceptor"
         p:targetMethod="decrementCounts" />
      
      <bean id="periodicThrottleCleanerTrigger" class="org.springframework.scheduling.quartz.SimpleTriggerBean"
         p:jobDetail-ref="throttleInterceptorJobDetail"
         p:startDelay="0"
         p:repeatInterval="1000" />
      </beans>
      
  12. (Optional) If you want to setup a ticket expiration policy for your Ticket Granting Tickets
    1. Create the file $project_home/src/main/webapp/WEB-INF/spring-configuration/ticketExpirationPolicies.xml
    2. Populate it with this contents.
    3. If you want to change the default ticket expiration settings you will want to alter the attributes p:maxTimeToLiveInSeconds and p:timeToKillInSeconds 
  13. Change directory to $project_home
  14. Run the following command to build you cas package (this cleans the workspace and builds the package).
    mvn clean package
  15. Create a soft link for freshly built cas.war file for Tomcat 7
    ln -s target/cas.war /var/lib/tomcat7/webapps/cas.war

    The new package should be automatically deployed by Tomcat

    NOTE: When rebuilding the cas.war file because you’ve made changes to the configuration, you will want to issue the following commands:

    service tomcat7 stop
    service tomcat7 start

    This is because Tomcat will re-deploy the cas.war and throw a bunch of errors in the log and act wonky, until you stop and restart Tomcat.

  16. Open a browser and navigate to “https://<your_cas_server&gt;:8443/cas” (minus the port number if you are using port 80 and 443).  You should see the CAS login screen.


At this point CAS should be up and hopefully there aren’t any errors being spat in your /var/log/tomcat7/catalina.out log.  But, CAS isn’t all the useful yet.  It just gives you a nice login box to no where.

In the next part I’ll discuss several things to make CAS more useful:

  1. Setting up PostgreSQL ticket management
  2. Configuring CAS to use LDAP
  3. Configuring CAS to use pooling for LDAP and PostgreSQL